

一. 概述
世平集團 ATU 伊布小編 (一部) 團隊針對 i.MX 相關技術整理了一系列博文,本篇文章將會針對如何對 OP-Gyro ( NXP i.MX93 ) WiFi / Bluetooth 功能如何驗證進行說明與介紹,希望能夠透過這些博文協助大家更了解 i.MX 的相關技術,未來 ATU 伊布小編 (一部) 團隊也會持續更新此系列的相關博文還懇請支持!
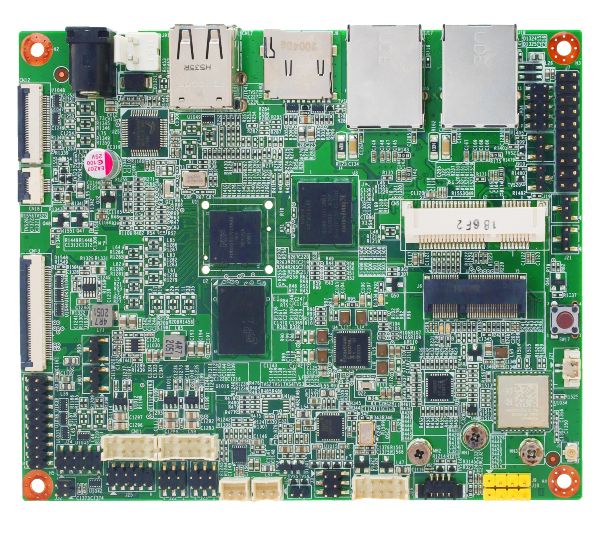
1.1 OP-Gyro 介紹
OP-Gyro 是世平集團使用 NXP i.MX93 為核心設計製作的 SBC 方案,其 SOC 規格包含了 Arm® Cortex®-A55 與 Arm® Cortex®-M33 兩種核心的處理器,這種多核心架構 ARM 處理器讓系統實現高效且即時的應用,如想了解更多關於 OP-Gyro 方案或 i.MX 的相關技術,可以透過 ATU 伊布小編 (一部) 團隊整理的系列博文索引來查找。
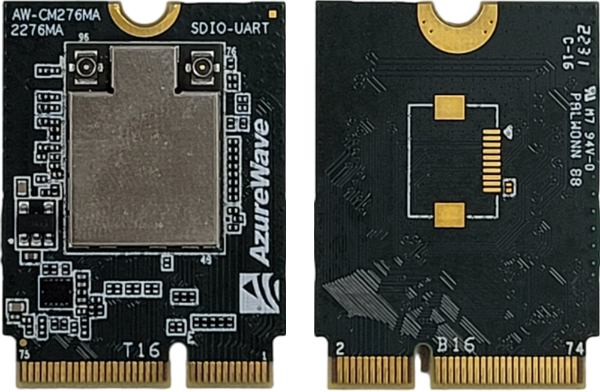
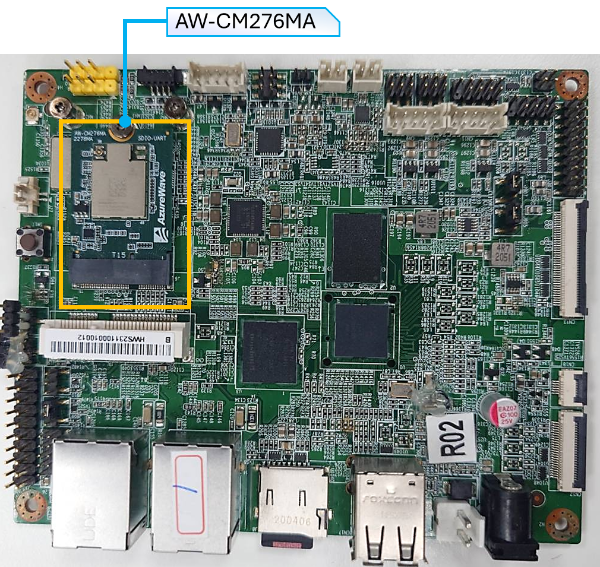
1.2 AW-CM276MA ( SDIO-UART ):WIFI / Bluetooth Card
AW-CM276MA-SUR 是 AW-CM276NF 的 M.2 2230 轉接板,使用 SDIO 和 UART 介面,支援 2.4GHz / 5GHz。
二. 環境建置
2.1 BSP 編譯
首先使用 Yocto Project 建立 BSP,更多詳細資訊請參考 Github 或【ATU Book-i.MX9系列】OP-Gyro ( NXP i.MX93 ) Linux 開發環境架設這篇博文:
$ mkdir <release> && cd <release>

$ repo init -u https://github.com/WPI-ATU-1/wpi-manifest.git -b imx-linux-mickledore -m imx-6.1.55-2.2.0.xml && repo sync

$ DISTRO=fsl-imx-xwayland MACHINE=opgyro source imx-setup-release.sh -b build

$ bitbake <image recipe>
2.2 燒錄
目前 NXP 所採用的映像檔格式為 wic 檔案,至開發環境中的 <Yocto Build>/tmp/deploy/images/<machine> 查看是否有 .wic 或 .wic.zst 檔案,在此以 SD Card 作為儲存裝置的燒錄方式為範例,想了解其他儲存裝置,請參考 【ATU Book-i.MX9系列】OP-Gyro ( i.MX93 ) 系統燒錄介紹這篇文章。
$ sudo dd if=<.wic> of=</dev/sdx> bs=1M stutas=progress conv=sync
三. WiFi 功能驗證
在此是使用 wpa_supplicant 進行設定與連線測試,我們有另外一篇【ATU Book-i.MX9系列】OP-Gyro ( NXP i.MX93 ) WiFi 功能驗證的文章說明使用 connmanctl 進行 Wi-Fi 測試,有興趣的也可以參考。
3.1 Wi-Fi 連線設定
首先我們先設定 wpa_supplicant ,在 wpa_supplicant.conf 輸入要連線的 Wi-Fi SSID 與 Password,並啟動 wpa_supplicant。
$ head -n 4 /etc/wpa_supplicant.conf > /etc/wpa_supplicant.conf.tmp
$ wpa_passphrase <WiFi-SSID> <WiFi-Password> >> /etc/wpa_supplicant.conf.tmp
$ mv /etc/wpa_supplicant.conf /etc/wpa_supplicant.conf.bak
$ mv /etc/wpa_supplicant.conf.tmp /etc/wpa_supplicant.conf
$ wpa_supplicant -B -i mlan0 -c /etc/wpa_supplicant.conf -D nl80211
Successfully initialized wpa_supplicant
rfkill: Cannot open RFKILL control device
root@opgyro:~# [   70.403343] wlan: mlan0 START SCAN
[   74.985799] wlan: SCAN COMPLETED: scanned AP count=31
[   74.994743] wlan: HostMlme mlan0 send auth to bssid fe:XX:XX:XX:f2:fd
[   75.005047] mlan0:
[   75.005059] wlan: HostMlme Auth received from fe:XX:XX:XX:f2:fd
[   75.026169] wlan: HostMlme mlan0 Connected to bssid fe:XX:XX:XX:f2:fd successfully
[   75.060258] mlan0:
[   75.060275] wlan: Send EAPOL pkt to fe:XX:XX:XX:f2:fd
[   75.098871] mlan0:
[   75.098885] wlan: Send EAPOL pkt to fe:XX:XX:XX:f2:fd
[   75.107020] IPv6: ADDRCONF(NETDEV_CHANGE): mlan0: link becomes ready
[   75.116302] woal_cfg80211_set_rekey_data return: gtk_rekey_offload is DISABLE
接著透過 udhcpc 命令自動取得 IP Address。
root@opgyro:~# udhcpc -i mlan0
udhcpc: started, v1.35.0
[   94.600256] imx-dwmac 428a0000.ethernet eth1: FPE workqueue stop
[   94.708146] imx-dwmac 428a0000.ethernet eth1: PHY [stmmac-1:01] driver [RTL8211F-VD Gigabit Ethernet] (irq=POLL)
[   94.718371] imx-dwmac 428a0000.ethernet eth1: configuring for phy/rgmii-id link mode
udhcpc: broadcasting discover
udhcpc: broadcasting discover
udhcpc: broadcasting select for 172.20.10.2, server 172.20.10.1
udhcpc: lease of 172.20.10.2 obtained from 172.20.10.1, lease time 86400
/etc/udhcpc.d/50default: Adding DNS 172.20.10.1
3.2 連線測試
使用 ifconfig 檢查一下。
oot@opgyro:~# ifconfig
lo: flags=73<UP,LOOPBACK,RUNNING>  mtu 65536
        inet 127.0.0.1  netmask 255.0.0.0
        inet6 ::1  prefixlen 128  scopeid 0x10<host>
        loop  txqueuelen 1000  (Local Loopback)
        RX packets 126  bytes 9854 (9.6 KiB)
        RX errors 0  dropped 0  overruns 0  frame 0
        TX packets 126  bytes 9854 (9.6 KiB)
        TX errors 0  dropped 0 overruns 0  carrier 0  collisions 0

mlan0: flags=4163<UP,BROADCAST,RUNNING,MULTICAST>  mtu 1500
        inet 172.20.10.2  netmask 255.255.255.240  broadcast 172.20.10.15
        inet6 fe80::4ae7:daff:fe78:35a3  prefixlen 64  scopeid 0x20<link>
        inet6 2001:b400:e298:8032:4ae7:daff:fe78:35a3  prefixlen 64  scopeid 0x0<global>
        ether 48:e7:da:78:35:a3  txqueuelen 1000  (Ethernet)
        RX packets 5  bytes 1038 (1.0 KiB)
        RX errors 0  dropped 0  overruns 0  frame 0
        TX packets 44  bytes 6922 (6.7 KiB)
        TX errors 0  dropped 0 overruns 0  carrier 0  collisions 0
最後實際 Ping Google DNS 8.8.8.8 進行測試。
root@opgyro:~# ping 8.8.8.8
PING 8.8.8.8 (8.8.8.8) 56(84) bytes of data.
64 bytes from 8.8.8.8: icmp_seq=1 ttl=54 time=389 ms
64 bytes from 8.8.8.8: icmp_seq=2 ttl=54 time=106 ms
64 bytes from 8.8.8.8: icmp_seq=3 ttl=54 time=127 ms
64 bytes from 8.8.8.8: icmp_seq=4 ttl=54 time=44.6 ms
四、Bluetooth
4.1 Bluetooth
透過以下命令做藍芽的設置,將 ttyLP4 Port 設置為藍牙 HCI(Host Controller Interface)設備及鮑率 115200,並啟動藍牙設備。
root@opgyro:~# hciattach ttyLP4 any 115200 flow
Setting TTY to N_HCI line discipline
Device setup complete
root@opgyro:~# [   45.971474] WPI: register_netdevice: dev->name: lo
[   45.976729] NET: Registered PF_ALG protocol family

root@opgyro:~# hciconfig hci0 up
接著透過 bluetoothctl 在此嘗試與電腦進行連線。
root@opgyro:~# bluetoothctl
[CHG] Controller 48:E7:DA:78:35:A2 Pairable: yes
[bluetooth]# power on
Changing power on succeeded
[bluetooth]# default-agent
Default agent request successful
[bluetooth]# pairable on
Changing pairable on succeeded
[bluetooth]# scan on
Discovery started
[CHG] Controller 48:E7:DA:78:35:A2 Discovering: yes
[NEW] Device 57:79:82:56:6C:9F 57-79-82-56-6C-9F
[DEL] Device 57:79:82:56:6C:9F 57-79-82-56-6C-9F
[NEW] Device A0:29:42:6C:32:10 TW-150484-02
[bluetooth]# pair A0:29:42:6C:32:10
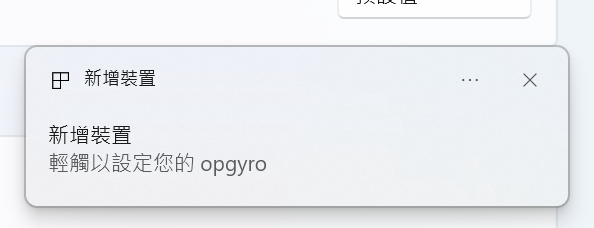
[bluetooth]# connect A0:29:42:6C:32:10
而在電腦上也會看到 OP-Gyro 裝置跳出,就代表連線成功了。
五、 結論
世平集團 ATU 伊布小編 (一部) 團隊針對 i.MX 相關技術整理了一系列博文,本篇文章針對 OP-Gyro ( NXP i.MX93 ) WiFi / Bluetooth 功能如何驗證進行說明與介紹,希望本篇文章的內容可以幫助到各位讀者更了解 OP-Gyro,後續也會有別篇文章繼續介紹如何在 OP-Gyro ( NXP i.MX93 ) 上使用周邊 IO 及相關驗證等做說明,懇請各位讀者多多支持 【ATU Book-i.MX9系列】OP-Gyro ( NXP i.MX93 ) 的系列博文。若未來讀者們有 i.MX 的相關問題歡迎隨時與世平集團做討論。
六、 參考文件
[1] https://www.nxp.com/docs/en/user-guide/IMX_YOCTO_PROJECT_USERS_GUIDE.pdf
[2] https://www.wpgdadatcong.com/blog/detail/74338
評論