Realtek Rtl8197G Secure boot 操作說明
若要開發具有Secure boot 的案子,首先須向Realtek 申請secure boot tool,開發環境建議使用ubuntu 18~22 的版本,CentOS 7 執行secure_boot_tool的腳本會無法產出AES_file.txt 導致 terminal 無法打印dev_pri_key。
secure_boot_tool tar 開後資料夾結構如下圖1:
先將原本開發的SDK 底下boot code source 的boot.img copy 到tool 下方btcode 的資料夾。

圖1 secure_boot_tool tar 開後資料夾結構
secure_boot_tool 是主要工作目錄,資料夾結構如下。

圖2 secure_boot_tool 是主要工作目錄,資料夾結構。
執行gen_img.sh腳本後生成的金鑰會放在keys 的資料夾下,生成加密image 會放在image 的資料夾下。
這裡須注意若keys 的資料夾下方已有金鑰,執行gen_img.sh腳本並不會產生新的金鑰而是直接利用原本的金鑰對image 加密。
反之若keys 的資料夾下方無資料,執行gen_img.sh腳本會生成新的金鑰,並用新的金鑰對image 加密。
keys 的金鑰很重要,放錯金鑰所產出的加密boot code 會因key 對不上導致無法開機。
1. Encrypt image
對image 加密會用到以下工具。
- Encrypt image --> curve 25519
- Sign image --> ED 25519
- Key pairs -- Generate gy curve_25519_KeyGen
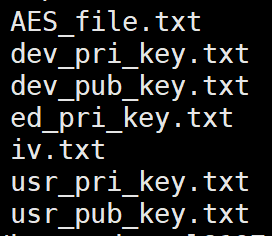
透過gen_img.sh腳本後生成的金鑰,會用到以下3 對keys :
a. User (for curve 25519 )
usr_pri_key.txt (私鑰 private key)
usr_pub_key.txt (公鑰 public key)
b. Device (for curve 25519 )
dev_pri_key.txt (透過腳本產出,如下圖3。這把key 要燒到efuse)

圖3 打印在terminal 上的dev_pri_key 包含 check sum 4 byte
dev_pub_key.txt
c. Sign (for ED 25519 )
ed_pri_key.txt
ed_pub_key (透過腳本產出,如下圖4。這把key 要燒到efuse)

圖4 打印在terminal 上的ed_pub_key 包含 check sum 4 byte
透過gen_img.sh 生成必要的keys,生成後可在keys 的forder 下找到如下圖5,務必保管好。
path : bootcode_rtl8197f/secure_boot_tool/keys/

圖5 透過腳本產出的金鑰
2. Burn Keys into Efuse
RTL8197G 板子上電開機,並在console 敲"u" 進入boot mode,
敲入 command "dbgmsg 4" 如下圖6。

圖6 command "dbgmsg 4"
在<RealTek> 下敲入腳本產出的"dev_pri_key.txt", "ed_pub_key.txt", 這兩把key 在執行gen_img.sh腳本後會打印在terminal 上。
若成功如下圖7。

圖7 Efuse write success
失敗如下圖8,請在敲一次key 直到成功為止。

圖8 Efuse write faill
最後敲入"bs" 來enable secure boot,請參考下圖9,也是要看到succ 才可以,否則須重下"bs"。

圖9 enable secure boot success
enable secure boot 後,還有以下保護設定,視需求來啟動。
bj : disable jtag
bu : disable uart (設定後 RTL8197G console 就無法打印。)
enable secure boot 後,進入RTL8197G boot mode 會顯示<password>,不再是先前的<RealTek>。
以上就是 Realtek RTL8197G Secure boot 的操作,希望對第一次操作的使用者有幫助。
Reference:
rtl8197G_Secure_Boot_Application_Note_SPI_NOR.pdf
Reference:
rtl8197G_Secure_Boot_Application_Note_SPI_NOR.pdf
評論